Suggestions:
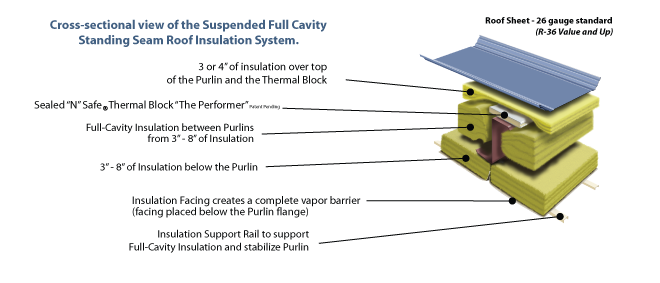
Before beginning installation of the SNS Suspended Full Cavity Insulation System, consider the following items to determine which works best for you.

• Layout for Clips on the ground & Install the Clips before the purlins are lifted in place. Remember to avoid interference at purlin laps. (Saves time but requires careful handling of purlins one at a time to lift in place)
• Layout & Install the Clips from a man basket after purlins are in place (Requires more time. Can be done as insulation rails are installed)
• Have your building supplier pre-punch holes into the purlins according to the spacing of the layout (May cost more)
Suspended System |
 |
Step 1: |
Layout and install the SNS Support Clips and purlins. If any other trades are involved in your project, have them install any other bracketry for HVAC, lighting, etc. before the insulation is installed. |
Step 2: |
If purlins are straight, install the insulation rails. Rotate the rail with web in vertical position, slide it up into the clip, rotate it 90 degrees to point flanges downward, and pull down into position toward the bottom of the clip. At joints in the support rail, nest the ends together and install together. |
Step 3: |
Place the lower faced blanket (from the roof top) through the purlin cavity down onto the support rails. (If the SNS Purlin Struts are not used, go ahead and install all of the lower blankets) |
Step 4: |
Install the SNS Purlin Struts over top of the lower insulation blanket, place and tighten all bolts. (See instructional guidelines for more information) |
Step 5: |
Install the remainder of the lower insulation blanket. At bay ends, cut away the insulation evenly the frame, leaving the facing to lay around the end of the blanket and up over the frame flange. The cavity fill blankets will lay over top of the facing. This will make a neat clean termination and should not require further process. |
Step 6: |
Install the rest of the insulation between the purlins. Add thickness layers as needed. |
Step 7: |
Install the SNS Thermal Spacers. |
Step 8: |
Install the top 3 or 4 “ unfaced layer over top of the SNS Thermal Spacer and install the roof system as you go. |
Installation Notes
In most cases, the insulation joints parallel to the purlins need to be sealed off and air tight, especially in cold or humid climates. We suggest these methods to accomplish that.
- Have your insulation supplier apply “Double Face Tape” to the outside of 1 tab only. Ask for a heavier or stronger protective layer to prevent tearing during its removal. Install with the facing tabs upward. Keep tabs as short as possible (2” Max) to maintain the best insulation performance. During installation, you will want the “taped” side of the insulation roll to be on the down-slope edge of the insulation blanket. This will eliminate interference with purlin flanges, clips and other bracketry while removing the tape’s protective paper layer.Don’t forget to remove the tape’s protective layer. Be careful while removing to insure a neat clean appearance from below. You may want to do this as you install the insulation so you can reach across the blanket. If you are really good, you could remove the paper before you install the blanket. Keep the tabs upward for best performance.
- Once the entire roof is completed, use a low bodied caulk to seal between the facing vertical joints. Most silicone based caulks are light bodied. Make sure the caulking is compatible with the insulation facing.
- Pull the tabs downward, roll them together, and staple together. This option may not have as neat an appearance as option 1 and 2.
- You may an idea of your own. The goal is to seal the joints.


