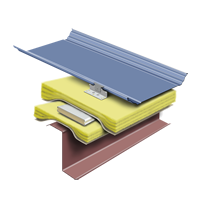
Thermal Block
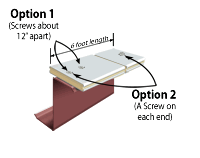
Our SNS® Thermal Spacer “The Performer” can be installed on the go (option 1) as insulation and roof sheets are installed or they can be installed all at once (option 2) with a man basket, either way, works great.

Each thermal spacer comes in six-foot lengths which are the standard widths of two sheet panels and the typical width of a metal building insulation roll, making the thermal block easy to handle and install.
Each thermal spacer comes with two flat-head screws to hold the six-foot thermal block in place.

Suggestions:
• When installing the thermal spacers, center it over the flange of the purlin
• Butt the thermal spacers end to end without added pressure
• Consider the placement of the flat-head screws through the thermal spacer, so that the SNS® panel fasteners do not conflict with the flathead screws
• When installing the insulation blankets, install to industry standards to allow for full expansion of fiberglass
Step 1:
Install SNS® Purlin Struts between purlins. (See instructional guidelines for more information)
Thermal spacers are placed over the tops of the purlins and are attached by two flat head screws. (Option 1) screw the first flathead screw at the end and the second screw around 12 inches from the first. (Option 2) screw the flathead screw at each ends.
SSR Panel Clip

Suggestions:
- • Only use clips that are ¼” taller than the profile of the panel
- • Standing Seam clips should not be located over the joints of the thermal spacer
- • Installing the SSR Panel Clip in the center to ensure the clip screws are screwed though thermal spacer and into the purlin flange below
- • Use a longer screw to fasten the SSR Panel Clip through the thermal block and into the purlin flange below. (SNS recommends #14 or larger diameter screw and is 1” in length)
Place the insulation blanket over the thermal spacers and attach the SSR Panel Clip on top of the insulation blanket and centered over the thermal spacer. The SSR Panel Clip will be fastened through the insulation blanket and the thermal block to the purlin flange, for a tight connection. Complete the additional steps of the standing seam roof as to manufacturer’s specifications.
The assembly process is like a typical standing seam roof. The only additional step is to set the thermal spacers in place with two flat-head screws and attach the standing seam clip through the thermal spacer and to the purlin flange.


